Preface
As with the Arch Linux installation guide, my basic criterion for deciding whether to write a new post is ‘was this actually hard for me to learn?’. Writing about things that already have plenty of good guides in English or Korean, things I had no trouble learning on my own and that people after me can easily learn too, would be nothing more than showing off, along the lines of ’look at all the cool stuff I know’.
GPG was ‘very’ hard. Material on it is scattered all over the place. Korean material in particular is practically nonexistent, which you can easily confirm by searching for ‘gpg’ at Korean bookstores like Kyobo or yes24. So, to help people who study this topic after me grasp the basic concepts easily, I cross-checked and reviewed the material I studied and gathered it into one document.
In the concepts part, I’ve gone into detail so that you won’t run into unfamiliar information when reading the practical examples that follow. If you only need the commands to follow right away, you can skip it.
I sincerely hope it helps.
Acknowledgements
Compared with other writing that leaves monumental achievements behind, this small post is insignificant, but it means a lot to me. Many people helped me write even this short piece. I’m grateful not only to those specifically mentioned below, but to everyone who passed on their knowledge by writing the documents I could access online and offline.
Michael W. Lucas’s book was a huge help.
Special thanks to my fellow student Kim Jinyoung of the Department of Public Administration at Kyung Hee University, who helped with preparation, writing, and revision. They reviewed the post with demanding, high standards and frankly suggested every change that needed to be made.
Finally, my thanks to my wife, who cheered me on as I suddenly declared ’this needs to be written up’, sat in front of the computer typing for days on end and digging through documents and books, and who, even though it isn’t her field, pointed out the parts that would be hard to understand for someone without a technical background.
What You Should Know First
I’ve written this so that it’s easy to understand even without a background in math or computers. Whenever a mathematical concept comes up, I explain it simply on the spot. If anything needs more explanation, please let me know at ‘[email protected]’.
Concepts
Background
PGP (Pretty Good Privacy), the starting point of everything, was developed by Phil Zimmermann in 1991. It directly defied various US government regulations, born of Cold War fears that enemy states would obtain advanced security technology. Zimmermann exploited a loophole in the law banning the export of software by exporting the PGP technology as a publication: he published a book containing the source code and concepts needed to implement PGP. As a result, he was caught up in legal proceedings for quite a long time, but the government’s lawsuit ended up making Zimmermann a hero of the freedom camp. For a more detailed history, see this link.
Terminology
Terminology is used quite confusingly in GPG and many other cryptography documents. So, at least in this post, I’ll define the terms used in the main text up front to keep things consistent. If you’ve already wrestled with several articles trying to understand GPG, reading this ‘Terminology’ section may actually make the concepts click. Even if the terms below make no sense at all at first, I expect they’ll be easier to understand if you come back to them after reading the main text.
- Plaintext: text exposed in a form that anyone who can read it understands immediately, like this document
- Ciphertext: text whose content is hard to grasp without a special method, like ‘R3i21+UlSPUlOVcT6AJ98popJr4TA5mlUSX’
- Password: an agreement made between parties, or a ‘word’ or ‘phrase’ I made to create or decrypt ciphertext (e.g., ‘1234’ in “The password for the encrypted document I sent is ‘1234’.”)
- Symmetric cryptography: a technique implemented with a ‘password’ known equally to both the other party and me (e.g., the technique used in “The password for the encrypted document I sent is ‘1234’.”)
- Asymmetric cryptography: a technique in which the other party and I have different keys for exchanging encrypted documents.
- Public key: a key that may be known to the outside world and that the other party in a communication must know in order to use it
- Private key: my secret key, which must never be known to the outside world
- Key pair: a public key and a private key, created at the same time and managed as a single pair
- Key ring: a single key ring may hold several key pairs (one primary key pair and multiple subkey pairs), or just one key pair (one primary key pair)
- Primary key: also called ‘Master Key’ or ‘Main Key’; exactly one pair is always created when the key ring itself is made. The most fundamental and important key pair. ‘Primary’ could be misread as an emphasis on importance, as if it meant ’the important key’. In this document, the primary key refers specifically to the key being used as the master key. Please keep this in mind (see the table below).
- Subkey: key pair(s), one or more, that can exist under a key ring managed by the primary key are called ‘subkey pairs’
- Hash: a ‘hash’ function takes input, long or short, letters or numbers, and returns a value of ‘fixed size (length)’. Well-known ones include ‘MD5’, ‘SHA-256’, and ‘SHA-512’.
- Key signing: the expression ‘signing a key’ is used to express ‘certification’ that ‘I have verified someone else’s key as safe’. It’s used even though it overlaps with ‘signature (S)’, which serves a different function. In the actual ‘key signing’ process, a key with the ‘C’ capability, corresponding to ‘certification’, is used. The trouble is that a key with the ‘C’ capability often has ‘S’ as well (see the table below). The ‘signing (C)’ here is different from the ‘signature (S)’ used together with encryption (E). When ‘sign’ appears next to words like ‘someone else’s key’ or ‘key’, it means ‘signing that the key is safe’ (C).
Since this seems to be the most fundamental source of confusion, I’ll emphasize it once more before moving on: public/private keys and primary/subkeys are distinguished by different criteria.
- Primary key
- Public key
- Can be made public
- Usually given the ‘C’ capability (used for ‘key signing’, certifying trust in other keys)
- Usually also given the ‘S’ capability (used to ‘sign’ documents so others can verify they came from the sender)
- Private key (<– secret key)
- Must never be known to the outside world
- If the primary key has the signing capability, this is the key actually used in the signing process
- Public key
- Subkey
- Public key
- Can be made public
- GPG normally (when using
gpg --full-generate-key) automatically creates a subkey with only the ‘E’ capability (document encryption)
- Private key (<– secret key)
- Must never be known to the outside world
- When the other party sends a document encrypted with my public key, this is the key used to decrypt it
- Public key
Symmetric Cryptography
Cryptography can be broadly divided into two kinds: symmetric and asymmetric. You’ve probably used symmetric cryptography as a student to pass secret notes to friends. For example, you agree in advance on a scheme that assigns numbers to the letters of the alphabet in order. If you’ve agreed to start A at 1 and number each letter in sequence, sending a note reading ‘3, 1, 18’ lets your friend naturally decode it as ‘CAR’.
It’s a method so simple and clear that students come up with it naturally to exchange secrets. It can be very effective for exchanging documents that aren’t all that important, because you can encrypt the document itself with some number, send it, and then send only the password to the recipient by phone or text message, and the recipient can open the document.
Even this seemingly simple algorithm can easily be made more complex. One step beyond the note-encryption scheme are the challenge-and-password systems used in the military. When a sentry spots someone acting suspiciously, the sentry gives a ‘challenge’, and the person must reply with the ‘password’ that matches it. You could develop this further by having several ‘passwords’ and having different units give different ones to identify who’s who, or by shortening the 24-hour reset interval to reduce how long a leak stays dangerous. Of course, the cost of managing it will rise too.
Weaknesses of Symmetric Cryptography
The real problem, however, isn’t an ‘inconvenience’ like rising management costs; it’s a risk that runs through symmetric cryptography itself. It’s very vulnerable to attacks that steal information in transit. In note encryption between friends, if the friend sitting in the middle overhears which number the letter ‘A’ turns into, they can decode every message passed along; and with military passwords, no matter how often they change, security is nullified entirely if there’s a spy who tells the enemy the password itself.
Asymmetric Cryptography
How on earth can this problem be solved? A cryptographic technique very well suited to it is the second category: asymmetric encryption. The name sounds hard, but the concept is very simple. It’s a technique that uses two keys: a public key that can be known to anyone without any problem, and a private key that must never be known. That’s why asymmetric cryptography is also called ‘public-key cryptography’. When A wants to send an encrypted note to B, A encrypts the note with B’s (the recipient’s) publicly known public key and sends it to B, and B decrypts it with the private key only B knows. No matter how many eavesdroppers there are along the way, all they can intercept is B’s public key, which A also knows, so it’s no help at all for decryption.
We’ve found a very effective method! But is such a technique actually possible? How can a document encrypted with B’s public key not be decryptable with B’s public key, but only with B’s private key? ‘Mathematics’ provided the answer. If you can’t believe this is possible and want to see for yourself, read the ‘Kinds of Algorithms’ section; if you’re happy to take it on faith, you can skip the ‘Kinds of Algorithms’ section.
Kinds of Algorithms
To actually implement the magic-like public/private key method, you need an ‘algorithm’, that is, an ‘actual methodology’ that makes the method possible. No matter how perfect something is conceptually, it’s meaningless if there’s no way to implement it. And in fact, a great variety of algorithms to implement it have been created and refined.
Since the trailing letter ‘A’ in the name of each algorithm stands for ‘Algorithm’, I write ‘DSA’ itself rather than ‘DSA algorithm’.
In the past, ‘DSA (Digital Signature Algorithm)’ was used. Today, ‘RSA’ is the most widely used. ‘RSA’ takes its name from the initials of its creators, ‘Rivest, Shamir, Adleman’. And more and more people are already actively using ‘ECDSA (Elliptic Curve Digital Signature Algorithm)’, which is expected to be used going forward. ‘ECDSA’ is an algorithm that improves ‘DSA’ with a geometric methodology called ‘ECC (Elliptic-Curve Cryptography)’. ‘ECC’ is a newly emerged approach attracting a lot of interest across many areas of cryptography.
Here, I’ll explain RSA, which is currently the most widely used.
How It Works
This is simplified for easy explanation; it’s correct in principle but differs from real-world use.
Like other cryptographic techniques, RSA uses ‘primes’. A prime here means a number that can’t be divided evenly by anything except 1 and itself (prime number). For example, 2, 3, 5, 7, 11, 13, 17, and so on. As the definition says, the listed numbers have only 1 and themselves as divisors.
RSA starts with two primes. In real situations it works with two enormously long primes, but for the sake of example I’ll use the small primes 2 and 7. Let p and q be 2 and 7 respectively.
First, compute ‘N’, the product of the two primes. That is, .
Then, among the numbers from 1 to N, find those that are coprime with N. Out of 1, 2, 3, 4, 5, 6, 7, 8, 9, 10, 11, 12, 13, 14, we exclude 2 since it divides 14. Likewise, multiples of 2 share a common divisor (2) with 14, so we exclude them. What remains so far is 1, 3, 5, 7, 9, 11, 13. 7 also shares a common divisor with 14, so we exclude it. In the end, 1, 3, 5, 9, 11, 13 remain. That’s 6 of them.
There’s a function (φ) that finds the count of these coprime numbers. That function is ‘’. Plugging in 2 and 7 for p and q, we get , so there are 6.
Now it’s time to make the encryption key. The encryption key e must satisfy two conditions.
- It’s greater than 1 and less than φ(n) ( 1 < e < φ(n) )
- It must be coprime with N and φ(n).
φ(n) was 6. So the first condition is easy: 2, 3, 4, 5 will do. The second condition, being coprime with 14 and 6, excludes multiples of 2. That leaves 3 and 5, but 3 shares a common divisor with 6, so it’s excluded. Therefore, e = 5.
The encryption key consists of (e, N). That is, (5, 14). You can see why both are needed, and what role each plays, in the ‘Application’ section.
In addition, this encryption key (5, 14) is the ‘public key’ to be shared in ‘public-key cryptography’.
Now we make the decryption key. The decryption key d is chosen so that its product with e, taken mod φ(n), is 1. Written as a formula, it must satisfy
.
The ‘mod’ operation is the remainder operation. It’s easy if you think of a clock. Telling time is a mod(12) operation. From 1 to 11, the remainder when divided by 12 is the number itself, and from 13 it goes back to 1. In other words, 1 and 13 are congruent under mod(12).
Going back to the original formula and filling in e and φ(n), which are already decided, we get . We need to choose a d that satisfies this. Increasing d from 1, grows to 5, 10, 15, 20, 25, 30, 35. The remainders when divided by 6 are 5, 4, 3, 2, 1, 0, 5. The first d that satisfies it, 5 (which makes 25), is too small, so I’ll just pick 11. 11 times 5 is 55, which also leaves a remainder of 1 when divided by 6, satisfying the formula.
The decryption key consists of (d, N). So the decryption key is (11, 14). This is the ‘private key’, which must not be shared in public-key cryptography.
Application
Let’s encrypt the text B with the encryption key (5, 14). For the example, say the computer recognizes letters by alphabetical position. Then ‘B = 2’.
Raise the converted 2 to the power of the first number of the encryption key (5), then take the remainder with the second number (14). That is, . is 32, so the remainder when divided by 14 is 4. So the ciphertext is sent as ‘D’.
The recipient starts decrypting. Decryption uses the same operation; only the numbers differ. The decryption key is (11, 14). Receiving ‘D = 4’, the recipient computes . , and the remainder when divided by 14 is 2. That is, ‘B’: the decryption succeeded.
The picture below sums it up.
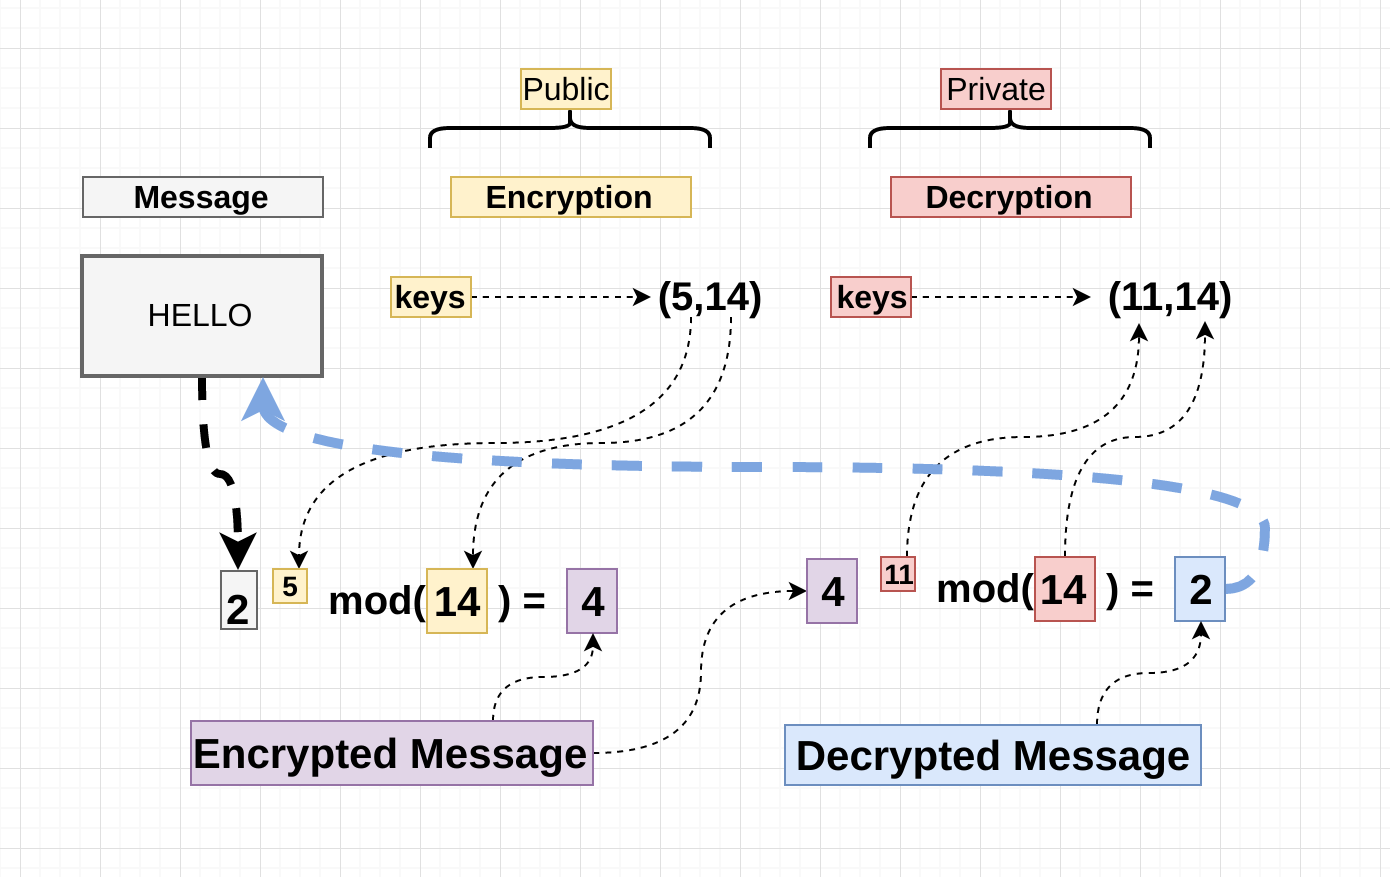 (image source: How does RSA work?)
Weaknesses of Asymmetric Cryptography
But asymmetric, or public-key, cryptography isn’t entirely without weaknesses. The most famous is the man-in-the-middle attack (MITM attack). When A and B want to communicate, X, who has found out, sits in the middle and passes X’s own public key to each of them as if it were the other party’s. If the message A sends to B is actually encrypted with X’s public key, which A believes is B’s, and X decrypts it with X’s own private key, reads the content, and then re-encrypts it with B’s real public key and sends it on, B has no way of checking whether anything was intercepted along the way.
To prevent this, the ‘signature’ method is used. That is, the sender encrypts the hash value of the encrypted message (the output of a scrambling function that returns a value of a fixed length regardless of the message’s length) with the sender’s own ‘private key’ and encloses it as a ‘signature’. The recipient decrypts the sender’s ‘signature’ with the sender’s public key, and the ‘message’ itself with the recipient’s own private key. If the hash value computed from the decrypted message with the same hash function matches, it’s certain that the message came from the sender, because the ‘signature’ is encrypted with the ‘private key’, and only the sender has that ‘private key’.
As you may have noticed, the public/private key algorithm used for signing can actually be the same as the one used for encryption. That is, RSA can be used both for signing and for encryption. You just use the sender’s ‘private key’ for one and the recipient’s ‘public key’ for the other.
People who use GPG more often sometimes create and use a separate key for each. For this, the GPG software uses abbreviations: ‘E’ (Encryption) for keys used for encryption and ‘S’ (Signing) for keys used for signing. In addition, ‘A’ means ‘Authentication’ and ‘C’ means ‘Certification’.
Key Ring
Advanced users, then, will want to manage separate keys for E/S/A/C. That’s exactly why GPG’s basic command creates a single primary key (master key). Under the primary key pair (public/private), you can create subkeys that each play a role. Those subkeys come attached to the primary key’s key ring.
To summarize, you create one primary key pair (public/private) that has only the ‘certify’ capability. Usually this primary key has no expiration date. Since it has the ‘certify’ capability, this spares others from having to periodically confirm that the key is really yours. But that means you need to pay far more attention to its security. If this primary key were compromised, the damage would be unimaginable.
On that primary key’s key ring, you create subkeys for E/S/A each. These subkeys usually have expiration dates. When they expire, you create new keys to keep things secure.
The primary key and the subkeys, four in total, each have a different KEY-ID.
When there are several subkeys, GPG finds the one needed for the operation on its own. When a signature is needed, it uses the key with ‘S’. And if there are several subkeys with the same role, it uses the most recently created one.
The primary key, usually used for ‘C’ operations (certification), is used to certify other people’s public keys that you’ve newly imported. It’s for certifying, once you’re confident through methods such as the ‘fingerprint check’ described below, that a public key someone just shared with you really belongs to them.
Web of Trust
Public-key encryption like GPG is built on a mutual Web of Trust. If A certifies B’s public key, stating that A actually knows B and has checked the fingerprint, then C, who knows A, can also trust B’s public key. Put the other way around, you must be very careful when certifying someone else’s public key. If a public key you certified without checking properly later turns out not to belong to that person, your own public key loses trust too.
Keyservers
A public key is meaningful when shared, because it’s required to encrypt messages meant for you. But you can’t have everyone who wants to send you a first message contact you and ask for your public key. That’s why ‘keyservers’ exist. You can easily share your public key to a keyserver using the GPG program, or register it by visiting one in a web browser.
However, you need to understand how keyservers basically work. Once a key is registered on a keyserver, it can’t be ‘deleted’. You can add information that it has been revoked, so that people searching for your public key later know you no longer use it, but there’s no way to delete the key itself from the server. This is also inconvenient because of the basic principle that many keyservers copy and store the information on each other’s servers. Even if you delete it from one server, it would soon be added back, since that server compares its list with the other servers’ and fills in whatever is missing.
So when registering a key on a keyserver, think carefully about whether you’ll really maintain it.
Finally, since it’s common practice to put user information in public keys, keyservers are also often used to harvest email addresses for sending spam. Keep in mind that by registering your public key on a keyserver, you may receive relatively more spam later on.
Fingerprints
The reason we check fingerprints to verify a person’s identity is simple: no two people have the same fingerprints (1 in 64 trillion). Even after a public key has been shared, fingerprints are used to check that the key really belongs to the other party. The ‘key’s’ fingerprint, of course. The fingerprint here is also used as the key ID. Generally, when a key ID is needed, it’s written without spaces, and when checking a fingerprint, it’s split into groups of 4 characters.
After receiving a public key, I urge you to compare the fingerprint character by character with the other party through a channel where you can be sure it’s really them, such as a phone call or a messenger.
GPG: Basics
PGP? GPG? OpenPGP?
PGP developed into a company that sells encryption products. It’s a commercial company selling encryption-related products based on PGP, the public-key encryption method first written in 1991. GPG is GnuPG, software through which various encryption tools are distributed and used free of charge. However, as with all GNU utilities, the license is very aggressive. So if you use GPG in a product you plan to sell commercially, you must use the GPL (GNU General Public License). The GPL requires that if you make a derivative product using something under that license, it must also use the GPL. It’s a license that forces you to publish the source code. OpenPGP is the term for the public-key encryption algorithm covering both PGP and GPG.
Call a PGP product GPG and they’ll get angry; call a GPG product PGP and the free software camp will get angry; but call it OpenPGP and both sides more or less accept it.
A rough analogy to help the explanation
Think of the primary key, especially the primary key’s fingerprint, as the ID on Naver (Korea’s largest web portal) that you’ve used since elementary school and have no intention of ever changing. ‘somebody13579’, which you used through school, through university, and at work, is now like an extension of yourself.
Now, say you got interested in Twitter and made an account. No matter how much you announce from the Twitter account ‘somebody111’ that it’s really you, your more suspicious acquaintances can’t help but be wary. But if you send an email from your Naver account to all your contacts saying “made a Twitter account called ‘somebody111’ lol”, the people who receive that email can be sure, through the email from ‘somebody13579’, that ‘somebody111’ is also you.
Here, the Twitter account ‘somebody111’ is the subkey. You can create new subkeys, delete existing ones, or extend the expiration of existing ones, but for the people around you to be sure that these actions came from you, the ‘primary key’ must be kept safe.
Generating Keys
Now let’s actually create a GPG key. (If $ gpg --version prints nothing about gpg, it isn’t installed. On a Mac you can install it with $brew install gnupg, and on Linux with your own package manager, e.g. #emerge gpg. You can see the various options with $ gpg --help.)
gpg --full-generate-key
You’ll see output like this.
gpg (GnuPG) 2.2.27; Copyright (C) 2021 Free Software Foundation, Inc.
This is free software: you are free to change and redistribute it.
There is NO WARRANTY, to the extent permitted by law.

Please select what kind of key you want:
  (1) RSA and RSA (default)
  (2) DSA and Elgamal
  (3) DSA (sign only)
  (4) RSA (sign only)
 (14) Existing key from card
Your selection?
I’ll explain what ‘sign only’ in options 3 and 4 means in the ‘In More Detail’ section. Here, for the sake of understanding, we’ll choose the default, option 1. Type 1 and press Enter.
Two more lines of output appear.
RSA keys may be between 1024 and 4096 bits long.
What keysize do you want? (3072) 4096
It asks for the length of the RSA key. For the explanation, type 4096 and press Enter.
RSA 2048? 3072? 4096?
Should the RSA key size be 2048 bits? Or 4096 bits, as recommended by the GitHub and GitLab help pages for adding GPG keys? As the GnuPG FAQ explains in detail from item 11.2 through 11.3 and 11.4, 4096 adds a little security, but it’s pointless compared with the added cost in computation speed and file size. In other words, it suggests that people who want 4096 out of security concerns should consider an ECC algorithm instead.
More output appears.
Requested keysize is 4096 bits
Please specify how long the key should be valid.
         0 = key does not expire
      <n>  = key expires in n days
      <n>w = key expires in n weeks
      <n>m = key expires in n months
      <n>y = key expires in n years
Key is valid for? (0)
The first line confirms that the requested key size is 4096 bits.
From there on, you set how long this key is valid. Since we’re learning here, type 7 to make it valid for only 7 days. Entering 0 means it never expires; entering just a number keeps it valid for that many ‘days’, and with w for ‘weeks’, m for ‘months’, and y for ‘years’.
While practicing, I recommend not making keys without an expiration date. That is, don’t enter just 0. If you later lose your revocation key, or lose access to a key you’ve already uploaded to a keyserver, you won’t be able to get rid of the key. So until you understand things well, I recommend making keys that are valid for as short a time as possible.
The next output shows the exact date and time the key will expire, 7 days from now as set.
Key is valid for? (0) 7
Key expires at Mon 13 Sep 2021 11:56:46 AM KST
Is this correct? (y/N)
Type y.
The next output is for entering personal information.
Real name: WooHyung Jeon
Email address: [email protected]
Comment:
You selected this USER-ID:
    "WooHyung Jeon <[email protected]>"

Change (N)ame, (C)omment, (E)mail or (O)kay/(Q)uit?
Enter your real name and email address, and leave the comment empty. Finally, type O to finish.
A window for entering a password appears. This password is the weakest part of public-key cryptography, so choose a difficult one carefully.
You can now check the created key with the command below.
Common options such as --list-keys and --list-secret-keys also work if you type key instead of keys at the end.
Password? Passphrase?
In Korea, ‘password’ is the generally used term, but strictly speaking, a password can be divided into a ‘secret word’ and a ‘secret phrase’. What we normally use is a ‘secret word’, while a ‘secret phrase’ allows spaces and can be as long as a sentence or even a paragraph.
In addition, --list-keys can be shortened to the -k option.
gpg --list-keys
Everything printed here is a public key. In other words, all of it can be shared with others.
It prints /home/(username)/.gnupg/pubring.kbx, the default configuration directory where keys are stored. (The .gpg extension is no longer used. Files that aren’t .kbx (keybox) can be converted to .kbx; look up how separately.)
Below that, pub indicates a ‘public’ key.
Next comes the algorithm used and the key length (rsa4096).
Then the creation date appears, followed by letters at the end.
The long string of numbers and letters is the key ID. The key fingerprint, long-format ID, and short-format ID are all parts of this key ID. If you look at $ gpg --list-key --keyid-format long and $ gpg --list-key --keyid-format short, you can see they’re shortened to 16 and 8 characters respectively.
And sub is the public part of the subkey. GPG creates this subkey by default when generating a key, to be used only for encryption. You can tell it’s an encryption key from the ‘[E]’ on the right.
Private keys can be listed similarly to --list-keys, shortened to the uppercase -K option.
gpg --list-secret-keys
This time, let’s look at the list of private keys.
The private part of the primary key is shown as ‘sec’, and subkeys as ‘ssb’. ‘ssb’ is known to stand for ‘secret subkey’.
Checking Fingerprints
To check the fingerprint of your own key, or a key someone shared with you, use the command below.
gpg --fingerprint [email protected]
Importing Keys
This is how to import a key from a keyserver. If you know an acquaintance’s email account, for example, you can search the keyserver for that email and import their public key.
gpg --keyserver pgp.mit.edu --recv OTHERS_KEY_ID
To certify (sign) a public key someone shared with you, use the command below.
gpg --sign-key [email protected]
Next is how to import your own private key that you stored separately, e.g. on a USB drive. This is useful not only for recovering a damaged key ring but also for storing the same key on your other devices.
gpg --import ./my-secret-gpg-key.asc
Exporting Keys
Since a private key must never be exposed, many users move it to a USB drive or similar. Above all, be careful never to expose it to a network. That is, never put it in a web browser, cloud storage, and so on. The moment it goes over a network, you might as well assume it’s exposed to malware that is constantly inspecting packets.
With GPG, ordinary key output looks like unreadable garbage to humans. So we add the --armor option (can be shortened to -a), which produces human-readable output. When saving that output to a file, it’s usually saved with the ‘asc’ extension, short for ‘ascii’, so it’s easy to recognize later.
gpg --export-secret-keys --armor YOUR_KEY_ID > ./my-secret-gpg-key.asc
If you look in your working directory, you’ll see the my-secret-gpg-key.asc file was created. Never expose this file to a network; store it somewhere safe of your own.
Separately, you can use software such as paperkey to make it easy to print.
Creating a Revocation Key
If you later learn that your key was exposed to a dangerous environment, or you lose your key altogether, you need a revocation key to effectively revoke the old key. I recommend storing the file created for this together with your private key in the safe storage you prepared above. A my-revoc-key.asc file is created in your working directory.
GnuPG 2.1 Update
Starting with GPG version 2.1, released in July 2017, a revocation key is automatically generated when a key is created. This revocation key is stored in the
openpgp-revocsc.ddirectory. So creating a revocation key will probably go from a strong recommendation to an optional step.
gpg --output my-revoc-key.asc --gen-revoke YOUR_KEY_ID
Deleting Keys
This is for deleting a key from a device, not revoking it. Even if you’re deleting all keys, you must delete the private key first.
gpg --delete-secret-keys YOUR_KEY_ID
Next, deleting the public key.
gpg --delete-keys YOUR_KEY_ID
Exporting to a Keyserver
As explained earlier, once a public key is registered on a server, there’s no way to ‘delete’ it other than marking it as revoked. Make sure you fully understand this before proceeding.
This is how to export your public key to a keyserver.
gpg --keyserver hkp://pool.sks-keyservers.net --send-key YOUR_KEY_ID
There are various keyservers, so feel free to look them up separately. But since keyservers check each other and stay in sync anyway, the result is the same wherever you upload.
Encryption
Symmetric Encryption
GPG keys aren’t limited to asymmetric encryption. Here’s how to do symmetric encryption with a shared password.
gpg --symmetric message.txt
Then enter the password at the prompt.
- You can use a different algorithm with the
--cipher-algooption. - You can also sign with the
--signoption.
Asymmetric Encryption
This is asymmetric encryption, the original purpose. The --encrypt option can be shortened to -e.
gpg --encrypt message.txt
- You can specify the recipient’s email address with the
--recipientoption. - The
--signoption can be used here too.
Decryption
This is how to receive and decrypt an encrypted document. It applies equally to decrypting signatures. The --decrypt option can be shortened to -d.
gpg --decrypt message.txt.gpg > decypted.txt
Signing
gpg --sign message.txt
As with the other operations, you can use options such as --symmetric, --encrypt, and --recipient.
To only decrypt a signature, you can use the --decrypt option, but if you want to go beyond decryption and verify in one step, you can use the --verify option.
GPG: In More Detail
Below are commands for those who want to manage separate E/S/A/C keys.
The Debian Subkeys page is a good reference. The process below is based on the YubiKey Guide.
Creating the Primary Key
Pass the --expert option when creating the key. It’s common not to set an expiration date on the primary key (master key), because the subkeys are used for most everyday work. The primary key serves as your main key for so long that its fingerprint alone can identify you. So you need to be even more careful managing it.
gpg --expert --full-generate-key
Please select what kind of key you want:
   (1) RSA and RSA (default)
   (2) DSA and Elgamal
   (3) DSA (sign only)
   (4) RSA (sign only)
   (7) DSA (set your own capabilities)
   (8) RSA (set your own capabilities)
   (9) ECC and ECC
  (10) ECC (sign only)
  (11) ECC (set your own capabilities)
  (13) Existing key
Your selection?
Type (8) to indicate that you’ll use RSA but choose the capabilities yourself.
When the expert option is given, the selection works as a toggle. If the capability you enter isn’t among the current ones, it’s added; if it’s already included, it’s removed. Let’s look at the example below.
Your selection? 8

Possible actions for a RSA key: Sign Certify Encrypt Authenticate
Current allowed actions: Sign Certify Encrypt

   (S) Toggle the sign capability
   (E) Toggle the encrypt capability
   (A) Toggle the authenticate capability
   (Q) Finished

Your selection?
Looking at ‘Current allowed actions’, Sign, Certify, Encrypt are included by default. Since the primary key we’re creating first will have only the Certification capability, Sign and Encrypt must be removed. First, type (E) to remove Encrypt.
Your selection? E

Possible actions for a RSA key: Sign Certify Encrypt Authenticate
Current allowed actions: Sign Certify

   (S) Toggle the sign capability
   (E) Toggle the encrypt capability
   (A) Toggle the authenticate capability
   (Q) Finished

Your selection?
You can see Encrypt is gone. Now type (S) to remove Sign as well.
Your selection? S

Possible actions for a RSA key: Sign Certify Encrypt Authenticate
Current allowed actions: Certify

   (S) Toggle the sign capability
   (E) Toggle the encrypt capability
   (A) Toggle the authenticate capability
   (Q) Finished

Your selection?
Type (Q) to finish.
Your selection? Q
RSA keys may be between 1024 and 4096 bits long.
What keysize do you want? (2048) 4096
Requested keysize is 4096 bits
Please specify how long the key should be valid.
         0 = key does not expire
      <n>  = key expires in n days
      <n>w = key expires in n weeks
      <n>m = key expires in n months
      <n>y = key expires in n years
Key is valid for? (0) 0
Key does not expire at all
Is this correct? (y/N) y
The rest of the process is the same as without the expert option. Enter your personal information.
GnuPG needs to construct a user ID to identify your key.

Real name: Dr Duh
Email address: [email protected]
Comment: [Optional - leave blank]
You selected this USER-ID:
    "Dr Duh <[email protected]>"

Change (N)ame, (C)omment, (E)mail or (O)kay/(Q)uit? o

We need to generate a lot of random bytes. It is a good idea to perform
some other action (type on the keyboard, move the mouse, utilize the
disks) during the prime generation; this gives the random number
generator a better chance to gain enough entropy.

gpg: /tmp.FLZC0xcM/trustdb.gpg: trustdb created
gpg: key 0xFF3E7D88647EBCDB marked as ultimately trusted
gpg: directory '/tmp.FLZC0xcM/openpgp-revocs.d' created
gpg: revocation certificate stored as '/tmp.FLZC0xcM/openpgp-revocs.d/011CE16BD45B27A55BA8776DFF3E7D88647EBCDB.rev'
public and secret key created and signed.

pub   rsa4096/0xFF3E7D88647EBCDB 2017-10-09 [C]
      Key fingerprint = 011C E16B D45B 27A5 5BA8  776D FF3E 7D88 647E BCDB
uid                              Dr Duh <[email protected]>
Creating Subkeys
Now create a key for each of S/E/A. It’s common to set expiration dates on subkeys.
To change or modify a key you’ve already created, use the command below.
gpg --expert --edit-key YOUR_KEY_ID
Creating the Signing Subkey
Both the signing and the encryption subkey are offered as separate options. In the example below, look at the beginning where it asks what kind of key you want: option (4) is RSA for signing only, and option (6) is RSA for encryption only. Enter what you need at each step.
gpg> addkey
Key is protected.

You need a passphrase to unlock the secret key for
user: "Dr Duh <[email protected]>"
4096-bit RSA key, ID 0xFF3E7D88647EBCDB, created 2016-05-24

Please select what kind of key you want:
   (3) DSA (sign only)
   (4) RSA (sign only)
   (5) Elgamal (encrypt only)
   (6) RSA (encrypt only)
   (7) DSA (set your own capabilities)
   (8) RSA (set your own capabilities)
Your selection? 4
RSA keys may be between 1024 and 4096 bits long.
What keysize do you want? (2048) 4096
Requested keysize is 4096 bits
Please specify how long the key should be valid.
         0 = key does not expire
      <n>  = key expires in n days
      <n>w = key expires in n weeks
      <n>m = key expires in n months
      <n>y = key expires in n years
Key is valid for? (0) 1y
Key expires at Mon 10 Sep 2018 00:00:00 PM UTC
Is this correct? (y/N) y
Really create? (y/N) y
We need to generate a lot of random bytes. It is a good idea to perform
some other action (type on the keyboard, move the mouse, utilize the
disks) during the prime generation; this gives the random number
generator a better chance to gain enough entropy.

sec  rsa4096/0xFF3E7D88647EBCDB
    created: 2017-10-09  expires: never       usage: C
    trust: ultimate      validity: ultimate
ssb  rsa4096/0xBECFA3C1AE191D15
    created: 2017-10-09  expires: 2018-10-09       usage: S
[ultimate] (1). Dr Duh <[email protected]>
If you look closely at the last part of the output, one primary key + private key, shown as ‘sec’, was created with usage: C, and below it one subkey + private key, shown as ‘ssb’, was created with usage: S.
Creating the Encryption Subkey
gpg> addkey
Please select what kind of key you want:
   (3) DSA (sign only)
   (4) RSA (sign only)
   (5) Elgamal (encrypt only)
   (6) RSA (encrypt only)
   (7) DSA (set your own capabilities)
   (8) RSA (set your own capabilities)
  (10) ECC (sign only)
  (11) ECC (set your own capabilities)
  (12) ECC (encrypt only)
  (13) Existing key
Your selection? 6
RSA keys may be between 1024 and 4096 bits long.
What keysize do you want? (2048) 4096
Requested keysize is 4096 bits
Please specify how long the key should be valid.
         0 = key does not expire
      <n>  = key expires in n days
      <n>w = key expires in n weeks
      <n>m = key expires in n months
      <n>y = key expires in n years
Key is valid for? (0) 1y
Key expires at Mon 10 Sep 2018 00:00:00 PM UTC
Is this correct? (y/N) y
Really create? (y/N) y
We need to generate a lot of random bytes. It is a good idea to perform
some other action (type on the keyboard, move the mouse, utilize the
disks) during the prime generation; this gives the random number
generator a better chance to gain enough entropy.

sec  rsa4096/0xFF3E7D88647EBCDB
    created: 2017-10-09  expires: never       usage: C
    trust: ultimate      validity: ultimate
ssb  rsa4096/0xBECFA3C1AE191D15
    created: 2017-10-09  expires: 2018-10-09       usage: S
ssb  rsa4096/0x5912A795E90DD2CF
    created: 2017-10-09  expires: 2018-10-09       usage: E
[ultimate] (1). Dr Duh <[email protected]>
If you look closely at the last part of the output, below the two existing ones, one subkey + private key, shown as ‘ssb’, was created with usage: E.
Creating the Authentication Subkey
The authentication key is a little different. Since the GPG utility doesn’t offer an authentication-only option by default, you approach it as you did when creating a new key with the --expert option: turn on only the authentication capability and turn everything else off.
gpg> addkey
Please select what kind of key you want:
   (3) DSA (sign only)
   (4) RSA (sign only)
   (5) Elgamal (encrypt only)
   (6) RSA (encrypt only)
   (7) DSA (set your own capabilities)
   (8) RSA (set your own capabilities)
  (10) ECC (sign only)
  (11) ECC (set your own capabilities)
  (12) ECC (encrypt only)
  (13) Existing key
Your selection? 8

Possible actions for a RSA key: Sign Encrypt Authenticate
Current allowed actions: Sign Encrypt

   (S) Toggle the sign capability
   (E) Toggle the encrypt capability
   (A) Toggle the authenticate capability
   (Q) Finished

Your selection? S

Possible actions for a RSA key: Sign Encrypt Authenticate
Current allowed actions: Encrypt

   (S) Toggle the sign capability
   (E) Toggle the encrypt capability
   (A) Toggle the authenticate capability
   (Q) Finished

Your selection? E

Possible actions for a RSA key: Sign Encrypt Authenticate
Current allowed actions:

   (S) Toggle the sign capability
   (E) Toggle the encrypt capability
   (A) Toggle the authenticate capability
   (Q) Finished

Your selection? A

Possible actions for a RSA key: Sign Encrypt Authenticate
Current allowed actions: Authenticate

   (S) Toggle the sign capability
   (E) Toggle the encrypt capability
   (A) Toggle the authenticate capability
   (Q) Finished

Your selection? Q
RSA keys may be between 1024 and 4096 bits long.
What keysize do you want? (2048) 4096
Requested keysize is 4096 bits
Please specify how long the key should be valid.
         0 = key does not expire
      <n>  = key expires in n days
      <n>w = key expires in n weeks
      <n>m = key expires in n months
      <n>y = key expires in n years
Key is valid for? (0) 1y
Key expires at Mon 10 Sep 2018 00:00:00 PM UTC
Is this correct? (y/N) y
Really create? (y/N) y
We need to generate a lot of random bytes. It is a good idea to perform
some other action (type on the keyboard, move the mouse, utilize the
disks) during the prime generation; this gives the random number
generator a better chance to gain enough entropy.

sec  rsa4096/0xFF3E7D88647EBCDB
    created: 2017-10-09  expires: never       usage: C
    trust: ultimate      validity: ultimate
ssb  rsa4096/0xBECFA3C1AE191D15
    created: 2017-10-09  expires: 2018-10-09       usage: S
ssb  rsa4096/0x5912A795E90DD2CF
    created: 2017-10-09  expires: 2018-10-09       usage: E
ssb  rsa4096/0x3F29127E79649A3D
    created: 2017-10-09  expires: 2018-10-09       usage: A
[ultimate] (1). Dr Duh <[email protected]>
At the end of the output, you now have one primary key + private key for C (certification) and a subkey + private key (ssb) for each of S/E/A.
Adding Personal Information
As when adding subkeys earlier, enter the prompt with the --edit-key option.
$ gpg --expert --edit-key YOUR_KEY_ID
Type adduid at the prompt to enter additional information.
In the example below, we enter an additional email address and approve it.
gpg> adduid
Real name: Dr Duh
Email address: [email protected]
Comment:
You selected this USER-ID:
    "Dr Duh <[email protected]>"

sec  rsa4096/0xFF3E7D88647EBCDB
    created: 2017-10-09  expires: never       usage: C
    trust: ultimate      validity: ultimate
ssb  rsa4096/0xBECFA3C1AE191D15
    created: 2017-10-09  expires: never       usage: S
ssb  rsa4096/0x5912A795E90DD2CF
    created: 2017-10-09  expires: never       usage: E
ssb  rsa4096/0x3F29127E79649A3D
    created: 2017-10-09  expires: never       usage: A
[ultimate] (1). Dr Duh <[email protected]>
[ unknown] (2). Dr Duh <[email protected]>

gpg> trust
sec  rsa4096/0xFF3E7D88647EBCDB
    created: 2017-10-09  expires: never       usage: C
    trust: ultimate      validity: ultimate
ssb  rsa4096/0xBECFA3C1AE191D15
    created: 2017-10-09  expires: never       usage: S
ssb  rsa4096/0x5912A795E90DD2CF
    created: 2017-10-09  expires: never       usage: E
ssb  rsa4096/0x3F29127E79649A3D
    created: 2017-10-09  expires: never       usage: A
[ultimate] (1). Dr Duh <[email protected]>
[ unknown] (2). Dr Duh <[email protected]>

Please decide how far you trust this user to correctly verify other users' keys
(by looking at passports, checking fingerprints from different sources, etc.)

  1 = I don't know or won't say
  2 = I do NOT trust
  3 = I trust marginally
  4 = I trust fully
  5 = I trust ultimately
  m = back to the main menu

Your decision? 5
Do you really want to set this key to ultimate trust? (y/N) y

sec  rsa4096/0xFF3E7D88647EBCDB
    created: 2017-10-09  expires: never       usage: C
    trust: ultimate      validity: ultimate
ssb  rsa4096/0xBECFA3C1AE191D15
    created: 2017-10-09  expires: never       usage: S
ssb  rsa4096/0x5912A795E90DD2CF
    created: 2017-10-09  expires: never       usage: E
ssb  rsa4096/0x3F29127E79649A3D
    created: 2017-10-09  expires: never       usage: A
[ultimate] (1). Dr Duh <[email protected]>
[ unknown] (2). Dr Duh <[email protected]>

gpg> uid 1

sec  rsa4096/0xFF3E7D88647EBCDB
created: 2017-10-09  expires: never       usage: C
    trust: ultimate      validity: ultimate
ssb  rsa4096/0xBECFA3C1AE191D15
    created: 2017-10-09  expires: never       usage: S
ssb  rsa4096/0x5912A795E90DD2CF
    created: 2017-10-09  expires: never       usage: E
ssb  rsa4096/0x3F29127E79649A3D
    created: 2017-10-09  expires: never       usage: A
[ultimate] (1)* Dr Duh <[email protected]>
[ unknown] (2). Dr Duh <[email protected]>

gpg> primary

sec  rsa4096/0xFF3E7D88647EBCDB
created: 2017-10-09  expires: never       usage: C
    trust: ultimate      validity: ultimate
ssb  rsa4096/0xBECFA3C1AE191D15
    created: 2017-10-09  expires: never       usage: S
ssb  rsa4096/0x5912A795E90DD2CF
    created: 2017-10-09  expires: never       usage: E
ssb  rsa4096/0x3F29127E79649A3D
    created: 2017-10-09  expires: never       usage: A
[ultimate] (1)* Dr Duh <[email protected]>
[ unknown] (2)  Dr Duh <[email protected]>

gpg> save
Removing the Private Key from the Primary Key
After exporting the primary key’s private key, delete the primary key’s private key from the device so that only the subkeys are used. To do this, look up the keygrip ID of the primary private key, then run the command below.
Warning
Make sure you’ve stored the revocation key and the private keys somewhere safe before doing this. Copying the whole
$HOME/.gnupgdirectory to a USB drive is also a good idea.Be very careful not to expose it to a network. With so many people using cloud storage these days, I often see people accidentally upload it to the cloud.
You can get the KEY_GRIP_ID used below by entering the following.
gpg --with-keygrip --list-key [email protected]
From the output, copy the Keygrip value for the primary key and run the command below.
rm -i $HOME/.gnupg/private-keys-v1.d/KEY_GRIP_ID.key
Then use $ gpg -K to check that a # has been added next to sec in the primary private key section. This # means the private key for that entry doesn’t actually exist on the device.
If there’s a secring.gpg directory under the default GPG directory (usually $HOME/.gnupg), delete it too.
Working with the Primary Key on a USB Drive
When you need to work with the primary + private key in the .gnupg directory you copied to a USB drive (for example, to certify an acquaintance’s newly imported public key), do it as follows. First, after mounting the USB drive,
export GNUPGHOME=/media/USB_MOUNT_POINT
gpg -K
Alternatively, you can work like this without changing the environment variable.
gpg --homedir=/media/USB_MOUNT_POINT -K
Changing the Subkey Password
The Debian documentation goes one step further. It deletes the primary key’s private key and changes the subkeys’ password, planning so that even if the password itself is compromised, the primary key’s password survives. If you want, go through this step too.
gpg --edit-key PRIMARY_KEY_ID passwd
When Something Goes Wrong
These methods assume that (1) the primary + private key is stored on a safe medium such as a USB drive, (2) it hasn’t been compromised, (3) and finally, the key has already been uploaded to a keyserver.
Mount the USB drive.
mount /dev/USB_DEVICE_PARTITION /mnt/usb
Set the USB drive, or the directory where your private key is stored, as a temporary home environment.
export GNUPGHOME=/mnt/usb/DIRECTORY
Enter the key editing environment.
gpg --edit-key YOUR_KEY_ID
At the GPG prompt, check the list and select the relevant key. Create the revocation certificate and save.
gpg> list
...(list)...
gpg> key 123
...(select key)...
gpg> revkey
Upload the updated key to the keyserver.
Keyservers Revisited
Above, to prevent beginner mistakes, I described keyservers as if they were very dangerous and vicious, but that’s actually misleading. Some keyservers are independent networks that don’t cross-check or copy with others, and recently there are also servers with what is effectively a sign-up step, where you verify your identity by clicking a link in an email you receive.
I use keys.openpgp.org. (1) When you register a public key, a confirmation link is sent to your email address. The key is only registered once you click the link. (2) According to its FAQ, it operates independently of the SKS pool and has no plans to become part of it.
If you still want to register, you can use the command below.
gpg --export-options export-minimal --export YOUR_KEY_ID | curl -T - https://keys.openpgp.org
References
- Michael W. Lucas: PGP & GPG: Email for the Practical Paranoid (ISBN: 1593270712)
- RFC 4880 - OpenPGP Message Format
- From GLEP 63, Gentoo Linux’s developer policy on OpenPGP key specifications, here are the minimum requirements and recommendations, translated. (GLEP 63: Gentoo OpenPGP policies)
- Minimum requirements
- The output digest must be SHA-2 (SHA-1 digests are also allowed internally), at least 256 bits. All subkeys must be self-signed using this digest.
- The signing subkey must be different from the primary key and must not have any other capabilities enabled.
- The primary key and the signing subkey must both be one of the following types:
- RSA, >=2048 bits (OpenPGP v4 key format or later),
- ECC 25519.
- All subkeys must expire no more than 900 days into the future.
- The key expiration date must be renewed at least 2 weeks before the previous expiration date.
- The key must include an email address using @gentoo.org as a UID.
- [Recommended] The key must be uploaded to the Gentoo keyserver.
- The primary key should have only the Certify capability.
- The primary key and the signing subkey should both be RSA, 2048 bits. (OpenPGP v4 key format or later).
- The key expiration date should be renewed annually, on a fixed date.
- Create a revocation certificate and store it in physical form in a safe place (it will be about ~300 bytes).
- Have an encrypted backup of your private key.
- Upload to SKS or other keyservers.
- Minimum requirements
Added Contents (2026-04-14): GPG Key Update
Summarized by ‘Google Gemini’
To extend a GPG key’s expiration date, use the
gpg --edit-key <KEYID>
command, then type expire and enter the new expiration time (e.g., 1y for one year).
After saving with save, you must re-upload your updated public key to any keyservers or services where it is shared, such as GitHub, using commands like
gpg --keyserver keyserver.ubuntu.com --send-keys <KEYID>
Step 1: Edit the key
- Open the GPG key editor by running
gpg --edit-key <KEYID> - In the editor, you can see the current expiration for the primary key. If you need to update a subkey, you may need to first select it using
key <number>(e.g., ‘key 0’ or ‘key 1’).
Step 2: Set the new expiration date
- Once the correct key is selected, type expire and press Enter.
- Enter the new expiration time. Common formats include:
- 1y for one year
- 6m for six months
- YYYY-MM-DD for a specific date
Step 3: Save and exit
- Type save and press Enter to apply the changes and exit the editor.
Step 4: Upload the updated public key
- To make the change public, you must upload the updated key to all public keyservers you use.
- For example, to upload to keyserver.ubuntu.com:
gpg --keyserver keyserver.ubuntu.com --send-keys <KEYID> - You may also need to update your key on services like GitHub. You can export your public key and copy/paste it into the service’s settings.
Also from Krisleech
Backup the key:
gpg -a --export [email protected] > YY.gpg.pub
gpg -a --export-secret-keys [email protected] > YY.gpg.sec
Move the keys on to something like a USB drive and store it safely in another location. Publish the public key:
gpg --keyserver keyserver.ubuntu.com --send-keys KEYID
gpg --keyserver pgp.mit.edu --send-keys KEYID
Also from Openpgp
#Retrieve
gpg --auto-key-locate keyserver --locate-keys [email protected]

#Refresh
gpg --refresh-keys

#Upload
gpg --export [email protected] | curl -T - http://localhost:8080